Stacey 2.3
Stacey 3 is not backwards compatible with Stacey 2.3. This website serves as an archive because the old 2.3 documentation was not migrated to the github wiki (that is currently hosting the Stacey 3 documentation).
Now unmaintained, all technical support is now choppy and community led as github issues.
Creating Pages
Each folder within /content which contains a .txt file will become a page. So to create a new page, you just have to make a new folder then create a .txt file within it. The name of the .txt file will tell stacey which template it should use for that page.
Pages are listed in reverse-numeric order using a numbered prefix on the folder name (10. 9. 8., etc.). The url used to access each page will be the folder name minus the number and dot.
ie. a folder named: 1.project-name-10 will be accessed via http://yourdomain.com/projects/project-name-10.
If you have clean urls disabled (which they are by default) then the url will be prepended with a ?/.
ie. a folder named: 1.project-name-10 will be accessed via http://yourdomain.com/?/projects/project-name-10.
If you leave the numbered prefix off a folder, then the page will not show up in any collections ($siblings, $children, etc.), but will still be accessible by its url. This is useful for creating ‘floating’ pages.
When naming your folders, rather than using underscores (_), you should use hyphens (-) to separate words.
ie. 1.project-name rather than 1.project_name or 1.project name.
Stacey supports unlimited depths of sub-pages, so you can split your categories into sub-categories & sub-sub-categories. Whatever works for you.
Images
Stacey picks up any images within the page’s folder and automatically inserts them into the page. Like pages themselves, the images are displayed in reverse-numeric order.
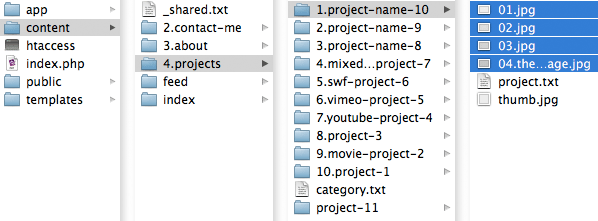
Images are inserted as is, so they will need to be cropped to the correct size before being added to the folder. The default template relies on images with a maximum width of 560px. Images get collated into a partial named :images, which can be inserted anywhere within a template file.
Other assets
Video & .swf files are embedded & included in the same way as images (collated into :swf & :video partials), whereas the content within any .html files will be inserted in place of the :html partial. This is useful for embedding Youtube or Vimeo videos in the page.
.swf or video files will need to be named after the file’s dimensions. ie. 1.800x600.mp4 — where 800 is the movie’s width & 600 is its height.
In addition, stacey will recognise any other assets placed within a page’s folder. Read more about handling other asset types.
Thumbnails
Each page can also have its own thumbnail. They can be added by placing a image file named thumb (.gif, .jpg or .png) within the page’s folder.
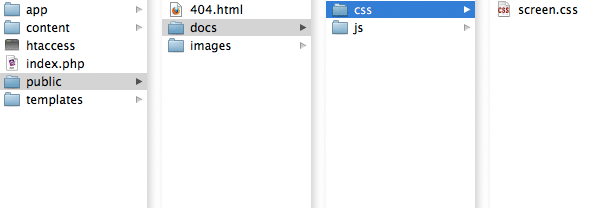
In the default templates, thumbnails are hidden using css. To turn their display back on you need to edit the main css file (in /public/docs/css/screen.css).
towards the bottom of the file, find the line that reads:
img.project-thumb { ... display: none; }
and change it to read:
img.project-thumb { ... display: inline; }
Your thumbnails can be any size you like, but on the default template are designed to be relatively small.